Visual Geo-location Editor
Use this editor for assets initially created in a local coordinate system and later uploaded to Construkted Reality.
Main Editor
This editor gives the user the ability to:
- geo-reference the asset on the global map
- adjust rotation and scale of the asset
1.
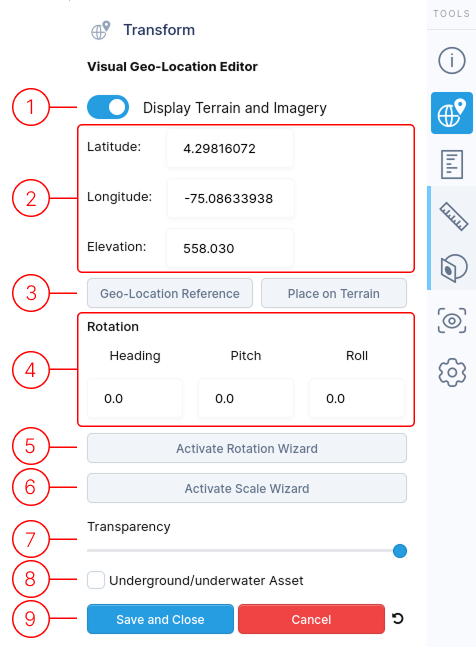
Toggle Display Terrain and Imagery to enable or disable the virtual globe map. When disabled, options 2 and 3 become unavailable.
See the Ground Plane Reference section for more details.
2.
Use Latitude, Longitude, and Elevation fields to geo-locate your asset on the virtual globe in WGS84 (EPSG:4326) coordinate system.
- Coordinates are initially applied to the bounding box center.
- Use Geo-Location Reference button to specify a different location to apply coordinates to.
- Use the RED, GREEN, and BLUE arrows to fine-tune your asset's position directly on the map.
3.
The Geo-Location Reference button allows for changing where on the asset's Latitude, Longitude, and Elevation values are applied to.
The Place on Terrain button will move the asset for proper terrain placement.
4.
Rotate your model using these controls:
- Heading (Blue): Around vertical axis
- Pitch (Green): Side-to-side rotation
- Roll (Red): Front-to-back rotation
5.
The Activate Rotation Wizard button will open the Rotation Wizard menu.
Details are provided below.
6.
The Activate Scale Wizard button will open the Scale Wizard menu.
Details are provided below.
7.
Modify transparency to view the underlying map through your model.
8.
For assets below ground level, enable this feature. The terrain becomes transparent on close-up views, with a guide line indicating your model's exact location.
9.
When finished editing, use these controls to exit the menu.
- Save and Close : Finalize your edits with this option.
- Cancel : Discard all changes made during this session.
- Reset icon : Revert all values back to defaults
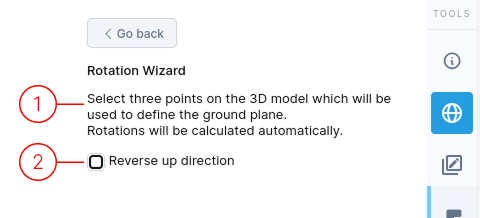
Rotation Wizard
This tool helps in correcting the rotation of an asset.
1.
Select three points on your model to create a reference plane. Rotation values automatically adjust to align this plane with the X/Y reference coordinate plane (gray plane).
2.
If your model appears upside down, use Reverse Up Direction to rotate it 180° on the roll axis.
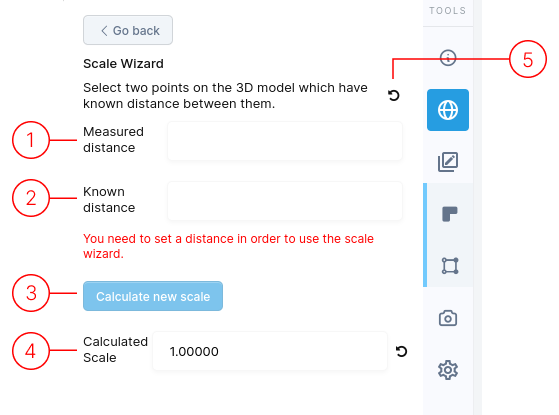
Scale Wizard
This tool helps you quickly fix an asset's scale.
How it works:
- You select two points on the asset.
- You enter the actual known distance between those two points.
- The tool then automatically resizes the asset so the distance you measured now matches the known distance.
1.
Select two points on your model that have a known distance between them. The Measured Distance field shows the distance between these points.
(This value is not editable)
2.
Enter the actual real-world distance between the same two points in the Known Distance field.
3.
Click Calculate New Scale button to determine the scale needed to correct your digital asset's size.
4.
The Calculated Scale value can be edited if desired. The Reset button resets the scale back to 1.0.
5.
The Reset button allows you to restart the selection of points if needed.
Ground Plane Reference
When Display Terrain and Imagery toggle is off, several UI changes occur:
- Location fields disappear:
- Latitude, Longitude, and Elevation fields are no longer visible.
- In this mode, we assume the asset isn't tied to a specific geographic location (it's not geo-referenced). Instead, it uses a Local Coordinate system.
- When using a Local Coordinate system, you can only select one asset at a time within a Project.
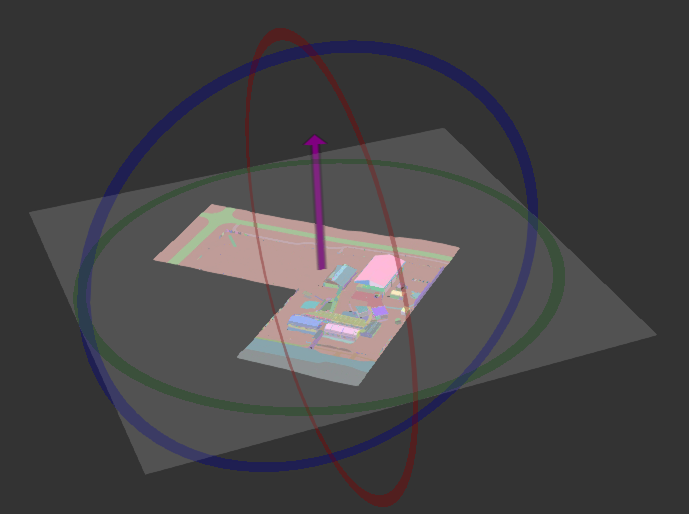
- Visual Reference Appears:
- A gray plane with a purple arrow is displayed. This is a visual guide to help you correctly rotate your model.
- Think of the gray plane as the "ground" for your asset, and the purple arrow as showing you the "up" direction.